How to clean a record player stylus safely (and what not to use)

As an Amazon Associate we earn from qualifying purchases. This page contains affiliate links — if you buy through them, we earn a small commission at no extra cost to you.
You can’t see the contamination that matters most. The stylus tip is the only component that ever touches the groove, yet it’s too small to inspect without magnification. So when a record starts to skip or crackle, you’re left guessing—is the vinyl dirty, or has something invisible built up on the needle? That uncertainty is the real problem.
A dirty stylus acts like fine-grit sandpaper, grinding away at irreplaceable groove walls with pressures measured in tonnes per square inch. The damage it does is permanent. But because you can’t easily observe the tip, most people don’t realise cleaning is needed until they hear the consequences. The good news is that a simple verification test—using a magnifier or a known-quiet record—can confirm whether your cleaning worked, turning guesswork into certainty.
This guide walks through the two tools that handle the job properly and the common mistakes that accelerate wear instead of preventing it.
The physics of a dirty stylus
That tiny diamond tip contacts the vinyl groove across an area measured in microns. The tracking force holding it there, typically between 1.5 and 2.5 grams, creates immense pressure at the point of contact. A speck of dust caught in between doesn’t just sit there harmlessly; it becomes a grinding agent with every rotation.
Debris in that gap has three effects. It lifts the stylus out of proper contact—acting as a spacer that prevents the tip from reading fine groove modulations accurately. It transfers contaminants from one record to the next, so a dirty needle soils every clean record it touches. And it accelerates wear on the diamond tip itself, since abrasive particles are often harder than the surfaces they’re grinding against.
Once a groove wall is worn, it’s gone forever. Records can be cleaned, but they can’t be un-worn. The needle, being replaceable, is the cheaper problem to solve—but neglecting it costs more than the price of a cleaning brush.
A typical pattern: an owner notices a “bad record”—scratchy, dull, full of crackle—and assumes the pressing is at fault. They clean the record repeatedly with no improvement. Eventually, someone suggests checking the needle. Closer inspection reveals a buildup of dark debris; replacing the stylus fixes the sound. That neglected needle had been slowly damaging every record it touched. If your turntable skips on a record you know is clean, or crackle follows the needle rather than staying in one groove, the stylus is the first place to look. Learn more about skip causes in our guide to record player skipping on every record .
The Goldring EXTRACT Kit: Verification through magnification
If you’ve ever finished cleaning a stylus and wondered whether you’d actually succeeded, this kit changes the game. The Goldring EXTRACT (paid link) combines a 10x magnifying lens, an anti-static brush, and a cleaning gel pot into one package.
View Goldring EXTRACT on Amazon → (paid link)
The 10x lens is the critical component. It lets you inspect the stylus before and after cleaning, replacing uncertainty with confirmation. Without magnification, you’re working blind. With it, you can identify whether you’re dealing with dry dust, a film of debris, or something more stubborn. The lens uses a compact hinge design that clips over most standard headshells.
The anti-static brush features a resilient pad that prevents bristle shedding—a problem you don’t want to create—with soft bristles designed to lift fluff without dragging across the delicate cantilever. The cleaning gel tackles stubborn residue that brushing alone won’t shift, formulated to be gentle on the stylus and avoid compromising the bond between diamond and cantilever.
For a thorough inspection or deep clean, this kit is superior because the magnifying lens lets you verify results visually, eliminating the risk of working blind. According to Goldring’s official product page, the EXTRACT kit is priced at around £39.00—an investment that pays for itself by protecting more expensive components.
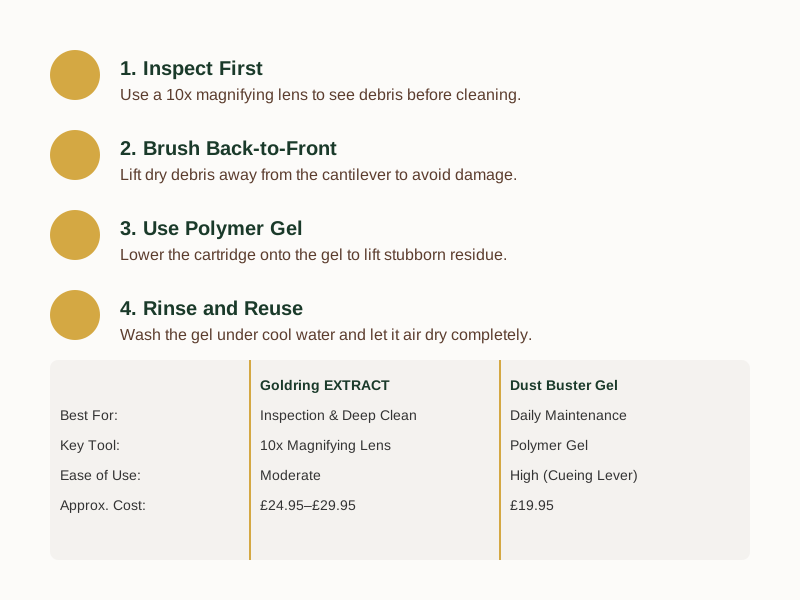
Follow this sequence: inspect with the lens first, brush away dry debris, then use gel for persistent residue. This order is designed to prevent damage. Skipping steps is where trouble starts. To see how this fits with overall record care, visit how to clean vinyl records at home .
Dust Buster Stylus Cleaning Gel: The daily habit
While the Goldring kit is for inspection, the Dust Buster (paid link) gel is for daily maintenance. It uses a polymer gel that you lower the cartridge onto using the cueing lever—no brushing, no guesswork. The gel contacts the stylus tip, picks up contaminants, and releases cleanly when you raise the arm. No liquid is involved, and no residue remains.
Check Dust Buster price → (paid link)
The polymer stays stable with repeated use—it doesn’t become sticky or break down over time. Removing dust and grime from the tip regularly is one of the cheapest ways to protect the stylus life you already have — a clean tip does the job it was designed for, rather than grinding embedded debris into the next record.
When the gel surface becomes visibly soiled (appearing grey or speckled), rinse it under cool water, air dry completely, and it’s ready for reuse. One pot lasts a long time. It’s an affordable way to maintain your collection between deeper cleans, and it’s usable by anyone with a cueing lever without special practice.
For routine maintenance, this gel excels because it’s reusable, requires only the cueing lever, and maintains consistent performance. While exact pricing varies, it’s generally an affordable option. When using the cueing lever, lower it slowly and let the arm drop under its own weight—never push it down manually.
In summary: Goldring EXTRACT (paid link) when you need visual confirmation; Dust Buster (paid link) for quick, repeatable daily cleaning. Plenty of people end up using both, but if starting with one, the gel is easier to incorporate into a regular habit.
Common mistakes and what to avoid
Several well-intentioned cleaning attempts cause more harm than good.
Don’t blow on the stylus. What feels like a gentle breath can push moisture and fine particles deeper into the cantilever housing, and it rarely removes existing debris effectively. Proper cleaning lifts contamination away—doesn’t redistribute it.
Isopropyl alcohol requires extreme care. It can dissolve stubborn residue, but incorrect concentration or overuse can damage the cantilever or suspension rubber. If used, apply sparingly, avoid the housing, and ensure complete evaporation before playback. For most people, gel cleaning eliminates liquid risks entirely.
Brush direction matters. Always brush from the cantilever toward the tip (back to front)—not the reverse. Brushing front-to-back can lever the cantilever out of alignment. The common error is brushing like you would your teeth—it feels natural but is mechanically wrong.
Avoid scrubbing. Gentle contact, held and lifted, is how these tools work. Dragging a brush back and forth wears down the diamond tip over time. That tip operates under immense pressure—it doesn’t need additional friction.
Finally, a worn-out stylus produces sound easily mistaken for a dirty record. If crackle and pop follow the needle to every record, even clean ones, the needle itself is likely the issue. Cleaning won’t restore a worn diamond. Check our guide to signs your record player needle is worn out before assuming cleaning will solve the problem.
How to establish a cleaning routine
When should I clean the stylus?
Before each side is ideal. It takes seconds with a gel and quickly becomes habit. Regular cleaning prevents particle buildup that accelerates wear on both stylus and records. Before playing a prized record—new pressing, rare find—a quick check is always wise.
Can I use a regular toothbrush?
No. Standard toothbrushes shed bristles and are too firm for the delicate contact patch. A dedicated anti-static stylus brush is designed not to shed, to dissipate static, and to flex at appropriate pressure. The small cost of a proper brush is insignificant compared to replacing a damaged needle or repairing scored records.
Are wet cleaners safe?
They can be risky if liquid reaches areas it shouldn’t. Moisture can corrode cantilevers and degrade suspension rubber—once that rubber fails, tracking geometry is compromised. The Dust Buster gel avoids this entirely by being a solid polymer. If using any liquid product, follow manufacturer instructions exactly and keep moisture away from the cartridge housing.
Tool comparison at a glance
| Feature | Goldring EXTRACT (paid link) Kit | Dust Buster (paid link) Gel |
|---|---|---|
| Best For | Inspection & Deep Clean | Daily Maintenance |
| Key Tool | 10x Magnifying Lens | Polymer Gel |
| Ease of Use | Moderate | High (Cueing Lever) |
| Approx. Cost | £39.00 | Varies by retailer |
| Reusability | Tools are reusable | Gel is reusable after rinse |
Confirming your cleaning worked
A clean stylus isn’t just about procedure—it’s about result. The simplest verification test is playing a known-quiet reference record after cleaning. If persistent crackle or skipping disappears, you’ve solved the problem. Alternatively, using a magnifier like the Goldring’s 10x lens provides visual confirmation that the tip is debris-free. This shift from assumption to evidence transforms maintenance from a chore into a precision habit.
These tools protect both your stylus and your records—a cartridge can cost from £30 to hundreds, while worn grooves are permanent. Get the Free Record Care Checklist to build a maintenance routine that keeps your setup performing optimally. Questions about your specific turntable? Get in touch .
Further reading
For a complete overview, see our guide on how often to replace a record player needle .
References
As an Amazon Associate we earn from qualifying purchases. The products linked above are ones we recommend based on independent research and owner feedback.
This article provides general guidance; always consult your turntable’s manual for specific care instructions.